
AI depth of field prompts
A practical focus workflow for AI stills: name the lens, the aperture and the distance between subject and background, then test the falloff before the sequence.

What does a depth of field prompt control?
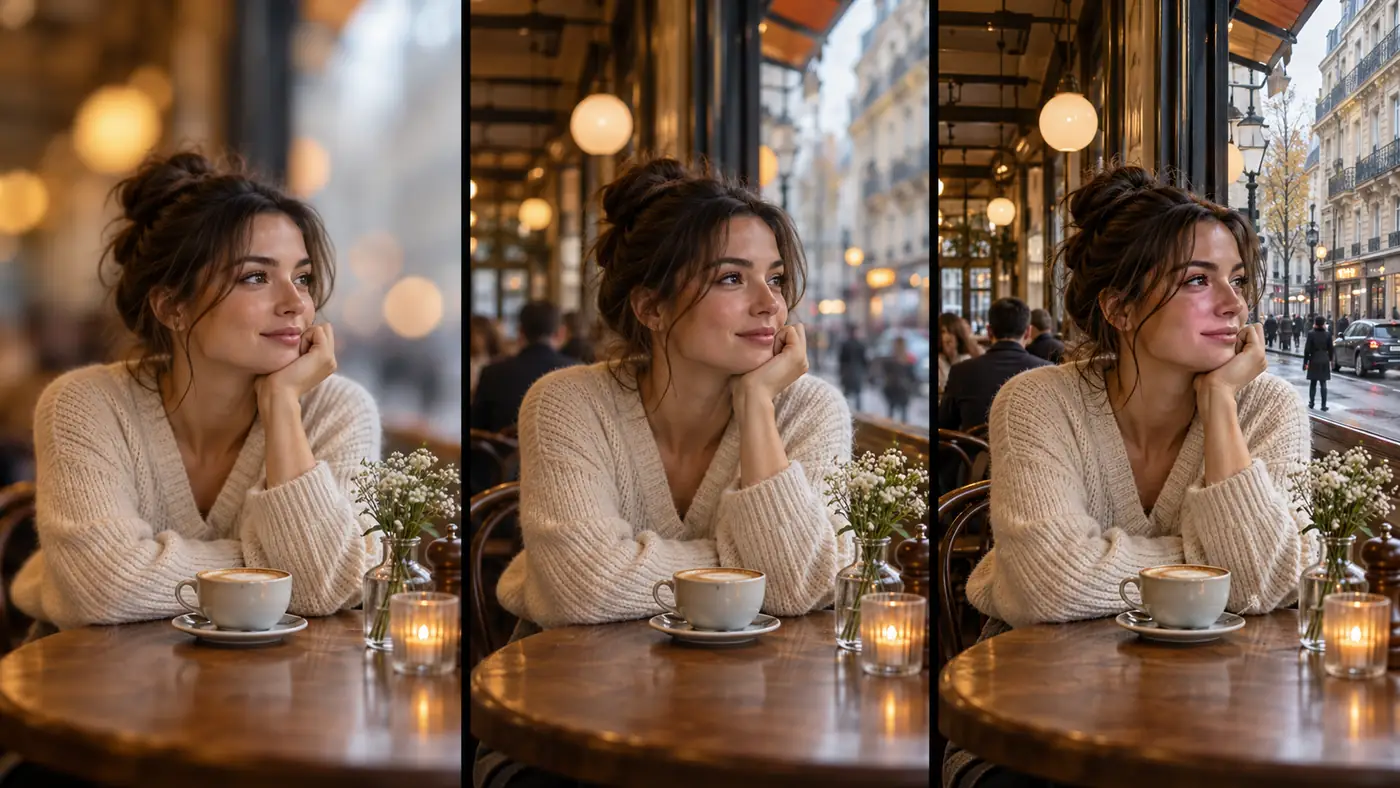
A depth of field prompt controls where focus starts, how quickly it falls away and how much of the background remains readable. It is not a request for “blurry background”; it is a request for a focus plane and a set of depth layers. The subject can be sharp while the background still has structure, or the whole frame can be soft except for one eye.
Current image models do not simulate a real lens, but they do respond to focal length, aperture and distance language because those terms appear in their training captions. The Hailuo depth-of-field guide uses a useful three-part frame: subject detail, background detail and the distance between them.
The rest of the prompt still has to do its job. A lens line cannot rescue a flat light or a cluttered composition. Treat depth of field as one control among light, lens, palette and blocking.
How do you write subject-background distance?
Name the subject, the background and the distance in plain language. “Subject at a cafe table, background street two blocks away” gives the model more information than “shallow depth of field”. The distance is what tells the model how large the background shapes should be and how much they should soften.
Add what must remain readable. A night portrait can keep the subject sharp and the neon signage soft, as long as the signs still read as colored shapes. If the background has no structure at all, the frame looks like a cutout rather than a photograph.
- Subject distance: close-up, medium shot or full body.
- Background distance: same room, across the street or a city block away.
- Focus plane: eyes, hands, a prop or the whole subject.
- Background readability: shapes, color and light, not text.
- Atmospheric layers: haze, smoke, rain or window glass.
- One clear far point for the eye to rest on.
Which lens and aperture numbers should you name?
Use a small set of lens and aperture anchors rather than a long list. The numbers are not physics in the model, but they consistently shift perspective and falloff. Pair the number with a purpose: deep focus for an establishing frame, a normal lens for dialogue, a short telephoto for a portrait.
| Lens + aperture | Depth character | Typical job |
|---|---|---|
| 24mm at f/5.6 | Deep focus, wide perspective, background readable. | Establishing shot, location plate, environmental portrait. |
| 35mm at f/2.8 | Moderate falloff, subject separated but still in the room. | Street portrait, dialogue scene, handheld frame. |
| 50mm at f/1.8 | Natural perspective, soft background, subject isolated. | Medium portrait, intimate dialogue, night exterior. |
| 85mm at f/1.4 | Strong compression, very shallow focus plane, large bokeh. | Close portrait, emotional beat, product detail. |
| 135mm at f/2 | Heavy compression, layered background, subject separated from the street. | Compressed city portrait, crowd isolation. |
How do you prompt creamy bokeh without flattening the frame?
Bokeh is the shape of the out-of-focus highlights, not a synonym for “blurry”. To get it, give the background bright points with a defined color: streetlights, window reflections, practical lamps or neon. Then keep the background shapes soft but present.
Avoid stacking “creamy bokeh” with “hyper-detailed background” or “everything in focus”; the model averages the contradiction into a flat mid-focus image. If the background needs to be visible, describe it as soft shapes and readable light, not as sharp detail.
- Name the light sources that will become bokeh.
- Keep the background low-frequency: shapes, color, glow.
- Say what stays sharp: eyes, hands, a collar.
- Avoid “hyper-detailed background” with shallow focus.
- Use one dominant background light rather than ten competing points.
- Check the bokeh at thumbnail size; it should read as atmosphere.
How do you keep the background readable?
Readable is not the same as sharp. A background can be out of focus and still tell the viewer where the character is: a warm doorway, a row of windows, a streetlight, a counter edge. Build one or two large shapes rather than a field of detail.
Use atmospheric depth to separate the planes: haze, rain, smoke, dust or a window reflection. These cues survive blur and give the frame a sense of distance even when the focus plane is very shallow.
How do you test focus at 2K, 4K and 8K?
Test at 2K first. Render the same subject, light and lens at three apertures: a very shallow f/1.4, a moderate f/4 and a deep f/8. Judge the eyes and the focus edge at full size, then judge the background shapes at thumbnail size. If the shallow version loses the story, it is too shallow.
Move to 4K only after the focus plan is approved. 8K is an upscale from the 4K render; it can make grain and edge softness more visible, so do not use 8K to rescue a focus decision that failed at 2K.
- Render the same frame at f/1.4, f/4 and f/8 at 2K.
- Check the eyes, lashes and focus edge at 100 percent.
- Check the background shapes at thumbnail size.
- Choose the aperture that serves the story, not the most blur.
- Re-render the approved frame at 4K for delivery.
- Inspect the 8K upscale for exaggerated grain or softness.
How does depth of field change with aspect ratio?
A wider frame includes more background, so a 2.39:1 frame needs stronger depth layers than a 4:5 portrait. The same 85mm lens can isolate a face in 4:5 and still leave a large, distracting background in 2.39:1.
Choose the aspect ratio before the lens test. For a wide frame, add foreground occlusion or a midground anchor so the eye has a path through the depth. For a portrait ratio, the subject can carry more of the frame and the background can be reduced to a soft field of color.
- 2.39:1: build foreground, midground and background layers.
- 16:9: keep one clear background shape and one subject.
- 4:5: isolate the subject; the background can soften more.
- 1:1: center the subject and use symmetry or a strong foreground.
- Test the chosen ratio before rendering the sequence.
What are common bokeh prompt mistakes?
The first mistake is asking for bokeh without a light source. The second is contradictory instructions: shallow focus plus a hyper-detailed background. The third is over-sharpening the subject so the focus edge becomes a cutout. The fourth is judging the image only at full size, where the background blur looks impressive but the thumbnail reads as a flat color field.
The fifth is changing the lens and aperture between frames in a sequence. If the first frame is 85mm at f/1.4, the second should not quietly become 35mm at f/8 unless the cut motivates it.
- “Creamy bokeh” with no bright source in the background.
- Shallow focus plus “everything sharp” in the same prompt.
- A background with no readable shapes or color.
- Over-sharpening the subject against a soft background.
- Changing focal length or aperture between frames.
- Judging focus only at full size, not thumbnail.
How do you keep focus consistent across a sequence?
Fix the lens, aperture and subject-background distance before the first frame. Then change only blocking, camera angle and expression. A sequence reads as one shoot because the focus behavior is stable, not because every frame is individually beautiful.
Review the set as a cinematic contact sheet at thumbnail size. If one frame has a different focus edge, the lens or distance line drifted. Keep the character with Soul ID and the light with cinematic lighting.
Frequently asked
Do lens and aperture numbers actually work in AI prompts?
They work as shorthand. The model does not simulate optics, but focal length and aperture terms shift perspective, compression and background falloff because they appear in the training captions. Pair them with a clear subject-background distance.
What is the difference between 50mm and 85mm in an AI prompt?
50mm reads as a natural, environmental lens with moderate falloff. 85mm compresses the background and isolates the subject more strongly, which is why it is the usual portrait anchor. The difference is most visible when the background has structure.
Why does my background look like a pasted blur?
The background probably has no readable shapes or light sources. Name one or two large background elements and let them soften, rather than asking for a completely featureless blur.
How do I keep the background readable with shallow focus?
Use large shapes, one dominant light source and atmospheric depth such as haze, rain or window glass. Readable is not the same as sharp; the viewer only needs enough structure to understand the space.
Is a 2K test enough to judge depth of field?
Yes for the focus plan. Judge the eyes and focus edge at 100 percent and the background shapes at thumbnail size. Move to 4K only after the aperture is approved; 8K is an upscale and will not fix a focus decision.
How do I keep the same focus across several images?
Keep the lens, aperture and subject-background distance identical, and change only blocking, angle and expression. Review the sequence as a contact sheet before rendering more frames.
Your first cinematic frame is one prompt away
Sign in with Google, pick a plan and keep every still at the resolution the model produced. Plans from $12/month, cancel at any time. No watermark, no re-encode.